How To Control Browser Caching with Apache 2
If you are like me, an up and coming network geek, you probably thought that browsers automatically cached a site's assets and media as you went through it and looked at each page. I was very surprised to find out that this was not the case. In fact, every time I went from page to page on my newly created MetaSkills.net blog all of the CSS, PNG, JavaScript and other media files that were common to those pages were being downloaded at each and every request. WOW! This was bad news for me and, if left untouched, it would have easily caused all of my bandwidth to be taken up when 50+ users came and started clicking around.
This tutorial documents how I learned about browser caching and how you can force a browser to maintain representations of your site's assets using Apache 2 and its configuration directives. These directives will allow you to have either general or fine grained control over how a browser caches each file/type on your site. If you want to skip ahead to the good part and just apply them, feel free to do so.
Useful Tools For This Tutorial
Before we go any further, let's cover two really useful tools that will help you figure out what is going on with your website and to see if your web server is controlling browser caching as it should.
About The tail Command
Tail is a program on Unix-like systems that is used to display the last few lines of a text file, most commonly used on log files. The command syntax is real simple and for the purposes of this tutorial you will only need to concern yourself with the specific command in the code block shown below; the path can be either an absolute string (from the server root) or relative to the directory you are working in. This command will let you see live additions as they are being written to your Apache 2 log file. To exit from this program, simply press Control-C on your keyboard.
$ tail -f /the/path/to/your/logfile.log
If you have ever used the OS X Server Admin tool, you may have noticed that each service listed in the left hand side has a corresponding "log" tab on the right that allows you to see that latest log entries for that particular service. The log viewing feature even has a nifty search box. What is really happening here is that the Server Admin GUI is using the same Unix tail command mentioned above to show you the last several dozen lines in that file. I normaly like using the GUI tools that the Mac has to offer, but I am not using the default Apache 1.3 that comes with OS X, rather the evaluation version of Apache 2 located in the /opt/apache2 directory. This means the GUI is not going to allow me to see the running log file of Apache2. Here is where using the underlying Unix tools on OS X comes in handy.
The tail command can be found on any OS X Server or Client installation; it is there by default. You can use this command from the server itself or you can SSH into the server with your laptop or other personal Mac and execute it from Terminal. Remember, this command is not useful to you if you do not have direct or SSH access to your web server where your log file is being written. If this is the case you will have to download it via your normal means and examine it in your favorite text editor.
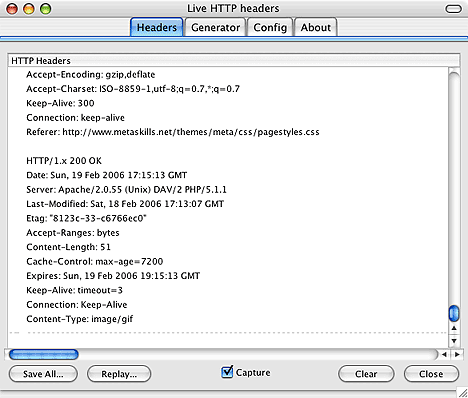
About HTTP Headers & The Firefox Extension
HTTP headers are transparent to the end user and most people don't even care that they exist at all. Despite this, they are included at the beginning of every response that comes from your server and they contain important information about that response. The most common information includes the date, type of server sending the HTTP response, and encoding of the HTTP response. If you have the gumption, go read the 40+ pages on the field definitions defined by the RFC 2616 for HTTP headers. Otherwise, let's just focus on caching and seeing those HTTP headers which are normally invisible.
This is where Firefox comes in handy. Many times I will use Firefox during the development of a website simply because it has many extensions that have been specifically written to ease the technical aspects of making a website. If you don't have Firefox already, you can download Firefox here. Once you have that installed and running, you can get the Live HTTP Headers extension from the developers site at mozdev.org.
Using the Live HTTP Headers extension is really easy. All you have to do is open the window by going to the "Tools" menu in Firefox and clicking on "Live HTTP headers", this will open a blank window. When you use Firefox to go to a page or file, the HTTP header(s) will appear in that new window. Below is an example:
If you are more comfortable using the Unix command line, there is one more useful tool that I would recommend called furl. It does the same thing as the Live HTTP Headers Firefox extension but only from the command line interface (CLI). It does not come on Mac OS X Server or Client by default but can be installed using the Darwin Ports system. I highly suggest using this vs. the Firefox extension since it is a leaner utility, but I'll leave it up to you whether you are more comfortable with a GUI or the command line.
Does My Site Control Browser Caching ?
Examining Your Apache Log Files (using tail) - Let's start with the easy way of finding out. Simply open your Terminal program in the utilities folder and tail the log file for your host by typing the command described above. While leaving the terminal window open, navigate to your site with your browser. You should see additions to your log file appear live in your terminal window and it would look something like this picture below.
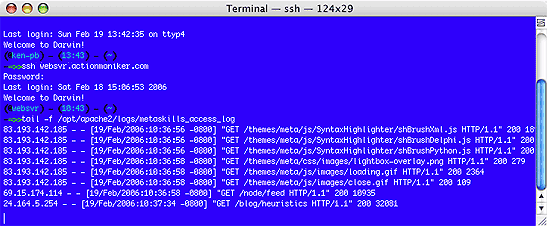
As you browse around while looking at this window, you should NOT see yourself logging requests for CSS, Images, GIFFs, or JPEGs over and over again. If you are the only person on your website at that time, this should be fairly apparent.
But, if you are not the only person on your site, it may get kind of noisy looking at all the log file entries whizzing by in the terminal window. In this case, you may find it useful to "pipe" an extra command to the tail program so that all you see is your requests and not the requests of others. To do this, simply make a note of your IP address and replace the 10.0.1.4 IP address in the command below with your own.
$ tail -f /the/path/to/your/logfile.log | grep 10.0.1.4
This combined command will now use the GREP command in conjunction with the tail program to search and display log entries with the matching pattern, in this case lines that contain your IP address. Remember to use Control-C to exit from the tail program when needed.
Examining Your HTTP Headers - The other way of finding out if your site is taking advantage of browser caching is to examine the HTTP headers on any given server response, be it a whole page or a single file. You can do this using the Live HTTP Headers Firefox extension mentioned above or by using the Unix furl program if it is installed on your system. A common HTTP header response will look something like this.
HTTP/1.1 200 OK
Date: Sun, 19 Feb 2006 16:42:05 GMT
Server: Apache/2.0.55 (Unix) DAV/2 PHP/5.1.1
Last-Modified: Sun, 08 Jan 2006 16:17:25 GMT
ETag: "73049-defc-37c52f40"
Accept-Ranges: bytes
Content-Length: 57084
Cache-Control: max-age=7200
Expires: Sun, 19 Feb 2006 18:42:05 GMT
Connection: close
Content-Type: image/png
What we are looking for in the header are the "Cache-Control" and "Expires" fields. These fields control how long the browser will cache this media or page asset from your server. Having a low value like "1" in "Cache-Control" can be just as bad as no value at all.
If you have those fields present, you've got a head start on the situation. If not, you may need to make sure Apache 2 is loading the mod_expires and mod_headers modules. Most installations and builds of Apache 2 include these modules since they are pretty essential. If you are using the Apache 2 in OS X Server's opt directory, this is the case and you only need to make sure that they are turned on by opening the http.conf file and making sure the following two lines do not have an # sign in front of them.
LoadModule expires_module modules/mod_expires.so
LoadModule headers_module modules/mod_headers.so
When these modules are loaded and working, we can then start to use the correct Apache 2 directives to control how browsers cache everything from pages to images across the whole site or in a specific directory.
Using Apache 2 To Control Browser Caching
Now that we are here, I can assume that you have both the mod_expires and mod_headers modules compiled and loaded into your Apache 2 installation. I can also assume that you have examined a few headers from your server's responses and determined that the "Cache-Control" and "Expires" fields are either not set or they are configured at such a low value to be ineffective. Lastly, you may have bypassed some header examinations and just determined that browser caching is not happening by tailing your Apache 2 log file and monitoring redundant requests. Either way, let's get to fixing Apache 2 to control browser caching that is right for you and your particular site.
Here is a code snippet of an Apache 2 directive that we will be using. This directive can be modified to suite your tastes or it can just be used "as is" for most users. The directives here can be placed into the <Directory> directive of your virtual host in http.conf or it can be placed loosely in a .htaccess file in the root of your website.
<IfModule mod_expires.c>
  ExpiresActive On
  ExpiresDefault "access plus 1 seconds"
  ExpiresByType text/html "access plus 1 seconds"
  ExpiresByType image/gif "access plus 120 minutes"
  ExpiresByType image/jpeg "access plus 120 minutes"
  ExpiresByType image/png "access plus 120 minutes"
  ExpiresByType text/css "access plus 60 minutes"
  ExpiresByType text/javascript "access plus 60 minutes"
  ExpiresByType application/x-javascript "access plus 60 minutes"
  ExpiresByType text/xml "access plus 60 minutes"
</IfModule>
Let's examine what is happening here in brief. If you are interested full documentation of the expires directive can be found on Apache's website along with different syntax formats than the ones used here. I like this format since it is inheritably legible. This directive will do the following:
- Set the default expiration of content in the browser cache to 1 second past the time of accessing that content. This is good for setting a catchall or default if you fail to explicitly define a content type in the following directives.
- Set the expiration of text/html pages to 1 second. My content management system Drupal does this already in its .htaccess file, but I include it here if you wish to change it. I think this is a good setting since technically most html pages are small and I like to err on the side of caution and always want my page content to be fresh. For instance, I may make changes to my global template and want it to be visible immediately.
- Set the expiration of standard images like GIFF, JPEG, and PNG to 2 hours.
- Set the expiration of CSS and JavaScript to 1 hour.
- Set the expiration of XML files such as RSS feeds to 1 hour.
References
If you are interested in knowing ALL about caching including proxy caching and CDNs which I covered in my last post, please read Mark Nottingham's article "Caching Tutorial for Web Authors and Webmasters". Also included below are links to Apache's website manuals for each of the modules discussed here.