Jekyll Tips And Tricks
 Last week, our localy Ruby community in Norfolk, VA re-launched the 757rb.org website. This was the third static website I have build using Jekyll and the second since the official v1.0.0 release. It was also completely different than any creative approach I have taken on. Please, go ahead and check it out real quick, I will wait.
Many things have changed with Jekyll over the years and it is always fun to stay current with the latest technical aspects of the tools we use. So I thought I would put a few of my own techniques out there to see what others think. If you find any of these useful or know of better ways to solve them, let me know.
Use Task Scripts
I have no idea where I picked this up, but the general idea is to create a tasks directory that holds a set of useful shell scripts. My Jekyll projects usually contain the following executables.
The jekyll wrapper script is only useful to those projects that need to perform additional steps before or after building the site. Notice the usage of $* after the jekyll build command. This is akin to Ruby's reverse splat args. It allows you to send any arguments to your own script that the jekyll command would normally take.
I will cover jekyll-livereload and deploy later in this post. The optipng script is a useful command line utility that compresses assets. While the post script allows you to easily create a new post. For example:
$ ./tasks/post "Jekyll Tips And Tricks"
Development & Production Environments
Sometimes you do not want a production feature turned on when developing your site locally. Blogs backed by DISQUS comments would be a great example. Likewise, maybe you want to develop a new feature that you can see during local development only to be enabled at a later time. Thanks to v1.0 of Jekyll and up, this is easy to do with different configuration files.
# In _config.yml
production: false
timezone: "America/New_York"

# In _config_production.yml
production: true
timezone: "America/New_York"
Here we have the default _config.yml acting as our default development configuration. It sets the production site variable to false while the _config_production.yml sets it to true. Remember the deploy task I mentioned above? This is a great place to pass down the --config argument to your own jekyll task. Here is a partial example of a deploy task.
#!/usr/bin/env bash
set -e

./tasks/jekyll --config _config_production.yml
Now you can write code like the following examples in your layouts or includes. Jekyll will automatically take any additional top level configurations and turn them into properties on the site object.
<!-- Only show DISQUS comments in production. -->
{% if site.production %}
<script type="text/javascript">
  var disqus_shortname = '...';
  ...
</script>
{% endif %}

<!-- Developing a local only feature not ready for production. -->
{% unless site.production %}
<section class="promotion">
  <header>T-SHIRT FUNDRAISER!</header>
  ...
</section>
{% endunless %}
Use The Asset Pipeline
If you have written Jekyll sites prior to the v1.0 release you have likely concocted up your own scripts to use CoffeeScript, Sass or both. Love it or hate it, as Ruby developers we got it good with Sprockets.
But now Jekyll has the power of the asset pipeline too. Just install the jekyll-assets gem. Here are a few tips to get you up and running faster.
First, remember that Sprockets is built on top of a gem named Tilt which is a generic interface to multiple template engines. Installing tilt does not install template engines, so make sure to install the ones you want to work with by explicitly declaring them in your Gemfile.
gem 'jekyll-assets'
gem 'coffee-script'
gem 'compass'
gem 'sass'
gem 'uglifier'
I found the default configuration for jekyll-assets very confusing. It mimicked a production environment Rails setting. All the files used the digest as part of the file name and compression was on by default. This made it really hard to debug. So to make jekyll-assets more like Rails defaults. Use these configurations for each jekyll environment.
# In _config.yml
assets:
  js_compressor:
  css_compressor:
  cache:
  cachebust: none

# In _config_production.yml
assets:
  js_compressor: uglifier
  css_compressor: sass
  cache: _cache/assets
  cachebust: hard
Pow It Up
Sure the new jekyll release has a serve option to boot up a web server. But like good software developers, we should be too lazy for such things. If you develop on a Mac and use Pow already for your Rails applications, why not just hook it up to serve your Jekyll site(s) too. Here are the steps.
First, add both rack and rack-rewrite to your Gemfile.
gem 'rack'
gem 'rack-rewrite'
Now create a config.ru file at the root of your project with the following contents.
gem 'rack-rewrite'
require 'rack/rewrite'

use Rack::Rewrite do
  r301 %r{^([^\.]*[^\/])$}, '$1/'
  r301 %r{^(.*\/)$}, '$1index.html'
end
Lastly, sym link the _site directory of your Jekyll project to the public. Then symlink your Jekyll project directory to Pow as you normally would do any Rails or Rack app.
$ ln -s _site public
$ cd ~/.pow
$ ln -s /path/to/myjekyllapp
You can now access your generated site at http://myjekyllapp.dev via Pow.
Live Reloads
I love LiveReload and have purchased the native OS X client for $9 from the Mac App Store. Personally, I could never get the guard-livereload gem working and just opted for the GUI client. So this tip will only focus on using the native Mac app.
It solves a few problems. First, it overcomes LiveReload's lack of rbenv support. It also assumes that your jekyll site is rather large and takes several seconds to build. Finally, assuming that you are working on your latest post and all you need to do is build a single page over and over again.
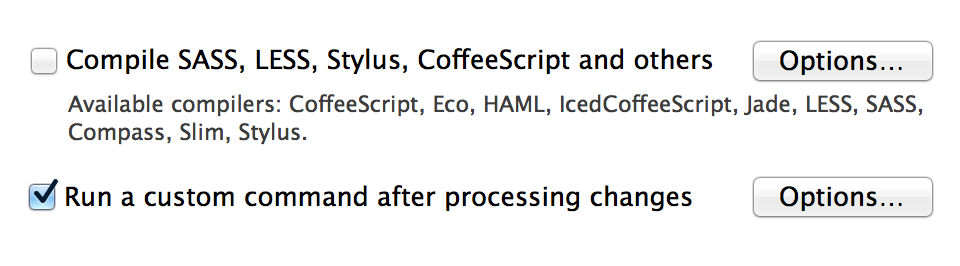
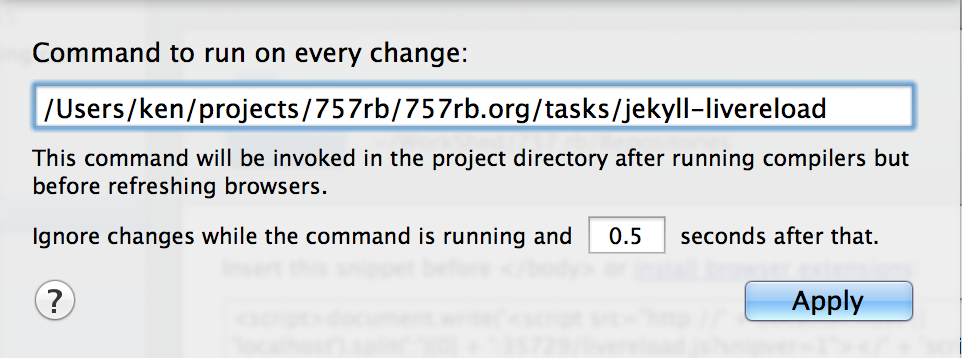
Setup LiveReload like you normally would by dragging your project's folder to their setup window. From here we want to configure your jekyll project to "Run a custom command...". Click on "Options..." and add the full path to your jekyll-livereload task script.
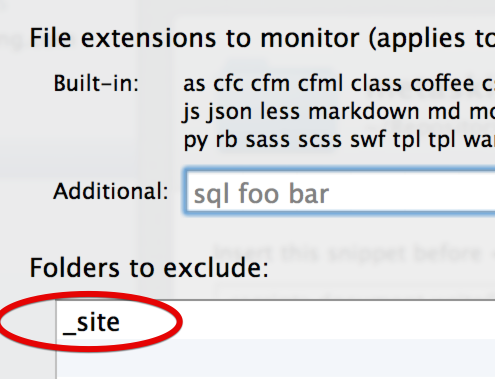 Also, make sure to exclude any directories that you do not want LiveReload to monitor. One critical folder is the jekyll
 _site directory. Watching this directly usually results in a indefinite LiveReload loop. Not good.
Your mileage may vary, but here is what I have found works for me in my jekyll-livereload script. This forces the LiveReload sub shell script to load up rbenv again. It then uses the --limit_posts argument to build just the last post. I have found this quickly refreshes the browser page automatically for me while working on my latest Jekyll post in markdown.
#!/usr/bin/env bash
set -e

export LANG="en_US.UTF-8"
export PATH="$HOME/.rbenv/shims:$HOME/.rbenv/bin:$HOME/.rbenv/plugins/ruby-build/bin:$PATH"
eval "$(rbenv init -)"

jekyll build --limit_posts 1